- How to setup a Linksys Router?
In this article, we will discuss How to setup a Linksys router. The Linksys wireless router gives high speed and reliable range with this you can create a powerful Wi-Fi home network.
It connects computers, wireless printers, and other Wi-Fi devices at speeds up to 300Mbps.
1. Fast wireless speed
2. Reliable wireless coverage
3. Advanced security
4. Quick to install
5. Easy to manage
What do you require?
1. A router from Linksys
2. The modem of your internet provider
3. Working internet connection
4. Network cable
5. A laptop or desktop computer
Step 1: Connect the router
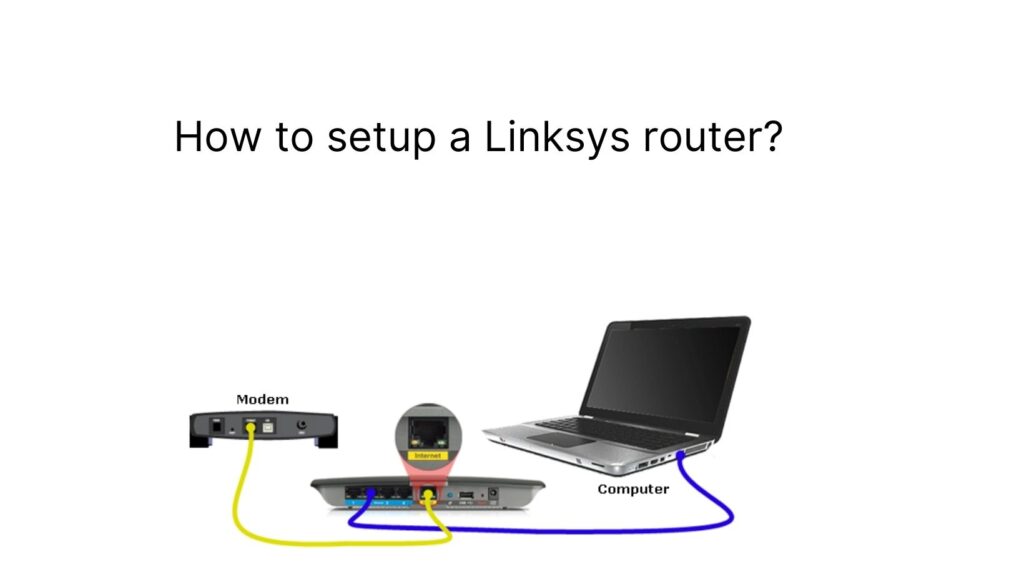
1. Firstly, unpack the power cable and network cable from your Linksys router.
2. Secondly, plug the first end of the network cable into a free LAN port on your modem.
3. Then, plug the other end of the cable into the (yellow) port labeled Internet of your router.
4. After that, Plugin the power cable into your router and plug the adapter into a free power outlet.
5. On the back of the router turn on the router with the on/off button (identified by the O and I).
Step 2: Install your router
1. Firstly, ensure that your PC is connected to the router.
2. Then, open an internet browser and navigate to the installation page of your router.
3. After that, enter the ‘Linksys Smart Wi-Fi setup’. Check the box next to ‘I have read and accepted the License Terms for using this software to continue. Then click on ‘next’.
4. After that, the router will now automatically try to find the correct settings for your connection.
5. Moreover, if you don’t use a modem from your provider, but have connected the router directly, you have to write a username and password.
6. In addition, If the connection is not working after this, the router will provide you with a number of tips that you can check.
7. If it is successful, the Linksys router will check if there are updates for the software. You can do this automatically in the future by checking the box for ‘Install future router updates automatically’ on this screen.
8. Also, Write the name that you want to give your wireless network under ‘Network Name,’. The name of the 5GHz network is automatically created by placing “_5GHz” behind the name. 9. Under ‘Network Password,’ enter the password for your Wi-Fi network.
10. Furthermore, if you set up the router via a wireless network, you will have to connect to the Wi-Fi network you just created after step 6.
11. Then, you have to create a password to access your router. With the assistance of this password, you log in to your router in the future to adjust settings.
12. Now you can get the screen “Your router is set up!” to see. It implies that the Linksys router has been installed accurately. The router shows an overview of the settings. Press ‘next’ to complete the installation.
13. Finally, the last step is to set up a ‘Linksys Smart Wi-Fi Account. You use this account to manage your router using the smartphone app from Linksys. However, If you intend to do that, it is advisable to enter this quickly.


